
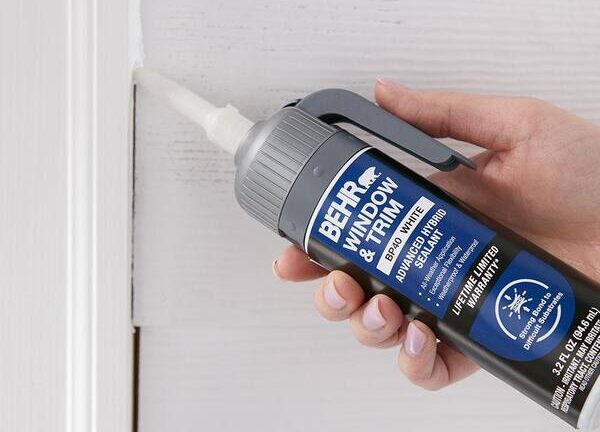
To use Behr Window and Trim Sealant, remove the nozzle cover and pull tab, then adjust the rotating cap to control the application rate. Press the handle to apply the sealant and smooth it before the skin forms using a dry tool with a concave profile.
Remember not to use water or soapy water for this process. This high-performance hybrid sealant provides superior stretch and durability on difficult substrates. Introducing Behr Window and Trim Sealant is the perfect solution for all your window and trim projects.
This easy-to-use sealant offers excellent performance and durability on even the most challenging surfaces. When it comes to applying the sealant, it’s important to follow a few simple steps to ensure a seamless and long-lasting finish. We will guide you through the process of using Behr Window and Trim Sealant effectively. So, let’s dive in and discover the best practices for applying this versatile sealant to achieve professional-quality results.
Benefits Of Behr Window And Trim Sealant
Experience the benefits of Behr Window And Trim Sealant with its high performance hybrid formula that offers superior stretch and durability on challenging surfaces. Learn how to use this advanced sealant by removing the nozzle cover, adjusting the rotating cap, and smoothly applying with a dry tool for a seamless finish.
Weatherproofing
Behr Window And Trim Sealant offers exceptional weatherproofing properties, making it an excellent choice for all types of window and trim projects. Its advanced hybrid formula creates a durable barrier that withstands extreme weather conditions, including rain, snow, and UV rays. By sealing gaps and cracks, this sealant prevents water and air infiltration, ensuring that your windows and trim remain protected against moisture damage, drafts, and energy loss.
Durability
One of the key benefits of Behr Window And Trim Sealant is its durability. This high-performance sealant is designed to last, even in high-traffic areas. Its strong adhesive properties ensure a secure bond to various materials, including wood, vinyl, and metal. Once applied, it forms a flexible and resilient seal that can withstand expansion and contraction caused by temperature changes. This durability prevents cracking, peeling, and crumbling over time, resulting in a long-lasting and maintenance-free solution for your window and trim projects.
Versatility
Behr Window And Trim Sealant is a versatile solution that can be used for both interior and exterior applications. Whether you’re sealing window frames, door trim, baseboards, or crown molding, this sealant adapts to different surfaces and substrates. Its compatibility with various materials makes it an ideal choice for any home improvement project. Furthermore, Behr Window And Trim Sealant is available in different colors, allowing you to seamlessly blend it with your existing trim or choose a contrasting color for added visual appeal.
In summary, the benefits of Behr Window And Trim Sealant are its superior weatherproofing properties, durability, and versatility. This high-performance sealant provides a reliable and long-lasting solution for protecting your windows and trim against the elements. With Behr Window And Trim Sealant, you can ensure a secure and energy-efficient seal that enhances the beauty and functionality of your home.
Preparing The Surface For Behr Window And Trim Sealant
To properly prepare the surface for Behr Window And Trim Sealant, start by removing the nozzle cover and adjusting the rotating cap. Press the handle to apply the sealant and smooth it out before it forms a skin. Avoid using water or soapy water during this process.
Preparing the Surface for Behr Window And Trim Sealant
Cleaning the Surface
Before applying Behr Window And Trim Sealant, it is crucial to clean the surface thoroughly. This ensures proper adhesion and helps to achieve a long-lasting seal. Here are the steps to follow when cleaning the surface:
- Start by removing any loose dirt, dust, or debris using a soft brush or a clean cloth.
- For stubborn stains or grime, you may use a mild detergent mixed with water. Gently scrub the area using a sponge or a soft brush.
- Rinse the surface with clean water to remove any residue from the cleaning solution.
- Allow the surface to dry completely before applying Behr Window And Trim Sealant.
Removing Old Caulk
If there is existing caulk on the surface, it is essential to remove it before applying Behr Window And Trim Sealant. Here’s how you can remove old caulk:
- Use a caulk removal tool or a putty knife to scrape off the old caulk gently. Take care not to damage the surface while doing so.
- Wipe off any remaining caulk residue using a clean cloth or sponge.
- For stubborn caulk, you can use a caulk remover solution. Follow the manufacturer’s instructions for application and removal.
- Once all the old caulk has been removed, clean the surface as mentioned earlier to ensure it is free from any debris or residue.
By following these steps and properly preparing the surface, you can ensure that Behr Window And Trim Sealant adheres effectively and provides a tight, long-lasting seal. Remember, a well-prepared surface is essential for achieving professional results.
Applying Behr Window And Trim Sealant
Learn how to use Behr Window And Trim Sealant effectively. Remove the nozzle cover and adjust the rotating cap to control application rate. Press the handle to apply and smooth the sealant before it forms a skin using a dry tool.
Behr Window And Trim Sealant is a high-performance product designed to seal and protect your windows and trim. The correct application ensures a long-lasting and effective seal that keeps out air, water, and drafts. To properly apply the Behr Window And Trim Sealant, follow these steps:
Correct Nozzle Attachment
Before you begin, ensure that the correct nozzle attachment is in place. Remove the nozzle cover, pull tab, and attach the desired nozzle tip for the application. This ensures precise control and allows for easy application.
Adjusting The Rotating Cap
Once the nozzle is attached, adjust the rotating cap to control the application rate. The rotating cap has MIN/MAX markings to guide you. Turn the cap clockwise to increase the flow and counterclockwise to decrease it. This allows you to adjust the sealant flow based on your specific needs.
Controlling The Application Rate
Press the handle of the sealant tube to start the application. While pressing, move the nozzle along the window and trim surface in a steady motion. Control the speed of the application to ensure an even distribution of sealant. Remember to apply enough pressure to fully fill the gaps and achieve a proper seal.
Smoothing The Sealant
After applying the sealant, it is essential to smooth it before it forms a skin. Use a dry tool with a concave profile, such as a caulk smoothing tool, to create a clean and professional-looking finish. Smoothing the sealant helps to remove any excess and ensures proper adhesion to the surface.
By following these steps, you can effectively apply Behr Window And Trim Sealant for a strong and durable seal. Remember to read the product instructions for additional information or specific requirements for your project.
Tips For Using Behr Window And Trim Sealant
When it comes to sealing windows and trim, Behr Window And Trim Sealant is a top choice for homeowners and professionals alike. This advanced hybrid sealant provides a durable and long-lasting seal, ensuring that your windows are protected from the elements. However, using sealant can be a tricky task, so it’s important to know the proper techniques, avoid common mistakes, and ensure a long-lasting seal. In this article, we’ll explore these tips for using Behr Window And Trim Sealant to help you achieve professional-grade results.
Proper Techniques For Sealing Windows
Sealing windows involves more than just applying sealant around the edges. To ensure a proper seal, follow these techniques:
- Clean the surfaces: Before applying the sealant, make sure the surfaces are clean and free from dirt, dust, and debris. Use a mild detergent and water solution to clean the windows and trim thoroughly. Rinse with clean water and let them dry completely.
- Apply primer (if necessary): If you’re sealing bare wood or other porous materials, it’s important to apply a primer before using Behr Window And Trim Sealant. This will improve adhesion and ensure a more durable seal.
- Use the right tool: Choose the appropriate tool for applying the sealant. A caulking gun or a manual applicator with a nozzle can help you control the flow of the sealant and apply it evenly.
- Apply in a continuous bead: Squeeze the trigger of the caulking gun or apply pressure to the manual applicator to release the sealant in a continuous bead along the edge of the window and trim. Make sure to fill any gaps or openings completely.
- Smooth the sealant: Use a dry tool with a concave profile to smooth the sealant before it forms a skin. This will help create a neat and professional-looking finish.
Avoiding Common Mistakes
While using Behr Window And Trim Sealant, it’s important to avoid these common mistakes:
- Over-application: Applying too much sealant can lead to messy, uneven results. Use a moderate amount of sealant to ensure a proper seal without excess waste.
- Under-application: On the other hand, using too little sealant can result in an ineffective seal. Make sure to fill all gaps and openings adequately to prevent air and water infiltration.
- Not cleaning the surfaces: Failing to clean the surfaces before applying the sealant can hinder adhesion and compromise the effectiveness of the seal. Take the time to properly clean and prepare the windows and trim.
- Not using primer (when necessary): Skipping the primer step on bare or porous surfaces can lead to poor adhesion and a weak seal. Always follow the manufacturer’s instructions and use a primer when recommended.
- Using expired sealant: Check the expiration date of your Behr Window And Trim Sealant before using it. Expired sealant may not perform as intended.
Ensuring A Long-lasting Seal
To ensure a long-lasting seal with Behr Window And Trim Sealant, consider these additional tips:
- Avoid painting over the sealant immediately: Wait for the sealant to fully cure before applying paint. This will ensure proper adhesion and prevent paint from compromising the seal.
- Regular maintenance: Inspect the sealed windows periodically and perform any necessary touch-ups or reapplication of sealant as needed. This will help maintain the integrity of the seal over time.
- Follow the manufacturer’s instructions: Always read and follow the manufacturer’s instructions for the best results. Behr provides detailed instructions on proper application and curing times.
By following these tips for using Behr Window And Trim Sealant, you can achieve a professional-looking seal that provides lasting protection for your windows and trim. Take the time to clean, prepare, and apply the sealant properly, avoiding common mistakes, and you’ll have peace of mind knowing your windows are sealed against the elements.
Cleaning Up And Maintaining Behr Window And Trim Sealant
After applying Behr Window And Trim Sealant, it is important to clean up any excess sealant and properly maintain the sealed area to ensure its longevity. By removing excess sealant, properly storing leftover sealant, and following maintenance tips, you can keep your windows and trim looking pristine for years to come.
Removing Excess Sealant
Excess sealant can mar the appearance of your windows and trim, so it is essential to remove it promptly. Follow these steps to remove excess Behr Window And Trim Sealant:
- Remove the nozzle cover and pull tab from the sealant tube.
- Adjust the rotating cap according to the desired application rate, following the MIN/MAX arrow.
- Press the handle of the sealant tube to apply the sealant to the desired area.
- Smooth the sealant before it forms a skin using a dry tool with a concave profile.
By following these steps, you can remove excess sealant and achieve clean, professional-looking windows and trim.
Proper Storage Of Leftover Sealant
After completing your window and trim sealing project, you may have some leftover Behr Window And Trim Sealant. To ensure its usability for future projects, proper storage is crucial. Here are some tips for storing leftover sealant:
- Seal the tube tightly using the cap provided.
- Store the sealant in a cool, dry place away from direct sunlight.
- Avoid extreme temperatures that can affect the quality of the sealant.
By following these storage tips, you can preserve the quality of your leftover Behr Window And Trim Sealant and ensure its effectiveness for future use.
Maintenance Tips For The Sealed Area
Proper maintenance of the sealed area is essential to maximize the longevity and effectiveness of Behr Window And Trim Sealant. Here are some maintenance tips to keep in mind:
- Regularly inspect the sealed area for any signs of damage or wear.
- Clean the sealed area using a gentle cleanser and a soft cloth or sponge.
- Avoid using abrasive cleaners or tools that can damage the sealant.
- If any damage or deterioration is observed, reapply Behr Window And Trim Sealant as needed.
By following these maintenance tips, you can ensure that your windows and trim stay protected and maintain their aesthetic appeal.

Credit: www.behr.com
Frequently Asked Questions For Behr Window And Trim Sealant How To Use
How Do You Apply Window Sealant?
To apply window sealant, follow these steps: 1. Remove the nozzle cover and pull tab from the sealant tube. 2. Adjust the rotating cap to control the application rate. 3. Press the handle to apply the sealant. 4. Smooth the sealant before it forms a skin using a dry tool with a concave profile.
5. Do not use water or soapy water for this process. References: Behr Window And Trim Sealant, The Home Depot, YouTube, Calfeutrage Apex, UniBond.
How Do You Open Behr Window And Trim Advanced Hybrid Sealant?
To open Behr window and trim advanced hybrid sealant, remove the nozzle cover and pull the tab. Then, adjust the rotating cap according to the MIN/MAX arrow to control the application rate. Press the handle to apply the sealant and smooth it with a dry tool before it forms a skin.
Do You Caulk Between Window And Trim?
Yes, you should caulk between the window and trim to prevent water from getting trapped inside.
How Do You Smooth Window Sealant?
To smooth window sealant, remove the nozzle cover and adjust the rotating cap. Press the handle to apply the sealant. Use a dry tool with a concave profile to smooth the sealant before it forms a skin. Avoid using water or soapy water during this process.
Conclusion
Behr Window and Trim Sealant is a superior choice for your window and trim projects. Its advanced hybrid formula provides excellent stretch and durability, ensuring long-lasting results. Applying the sealant is simple and hassle-free, thanks to its user-friendly design. Remember to smooth the sealant before it forms a skin for a seamless finish.
Choose Behr for professional-quality caulking and sealing.