
To seal a shower door frame, you should apply caulk on both the inside and outside of the frame. Caulking helps prevent water leakage and mold growth. It is best to use silicone caulk for this purpose.
1. Understanding The Importance Of Caulking A Shower Door Frame
Caulking a shower door frame, whether inside or outside, is essential for preventing water leakage and ensuring a watertight seal. Properly applied caulk helps control water from escaping and prevents the growth of mold and mildew. It is recommended to caulk along the vertical and horizontal planes where two ends meet, leaving areas meant for drainage free from caulk.
Why Is Caulking Necessary For A Shower Door Frame?
Caulking plays a crucial role in maintaining the integrity and functionality of a shower door frame. When a shower door is installed, there are various joints and seams where water can seep through, leading to potential damage and issues such as mold and mildew growth. Caulking these areas effectively seals the gaps, creating a watertight barrier that prevents water from escaping and protects the surrounding walls and floors.
The Benefits Of Properly Caulked Shower Door Frames
Properly caulked shower door frames provide a range of benefits, including:
- Waterproofing: Caulking seals gaps and prevents water from leaking out of the shower enclosure, ensuring that the shower area remains dry and free from water damage.
- Mold and mildew prevention: By sealing potential entry points for water, caulk helps to inhibit the growth of mold and mildew. This not only keeps the shower area cleaner and more hygienic but also reduces the risk of respiratory issues.
- Enhanced durability: Caulking reinforces the structural integrity of the shower door frame by preventing water-related damage, such as rotting wood or rusting metal. This helps extend the lifespan of the shower enclosure.
- Aesthetics: Properly applied caulk creates a clean and seamless appearance, enhancing the overall look of the shower door frame. It fills in gaps and creates a smooth transition between different materials or surfaces.
In conclusion, caulking a shower door frame is essential for maintaining a leak-proof and visually appealing shower enclosure. It safeguards against water damage, mold, and mildew growth, and extends the lifespan of the shower door frame. By understanding the importance of caulking and following proper techniques, homeowners can ensure a durable and attractive shower area in their bathrooms.
2. Determining If The Caulk Should Be Applied Inside Or Outside
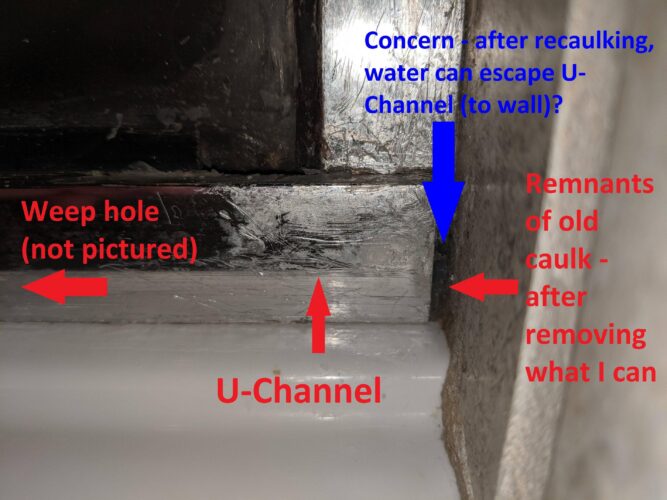
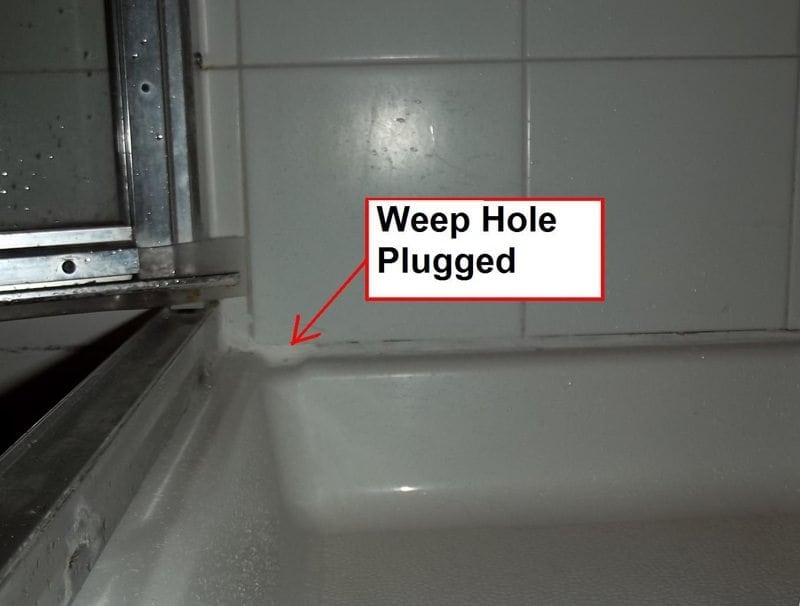
When determining whether to apply caulk inside or outside of a shower door frame, it is important to apply it along the vertical and horizontal planes where the two ends meet. Leave areas meant for drainage, such as weep holes in the door track, uncaulked.
Proper application of caulk inside the enclosure will prevent mold and mildew growth and assist with water control.
Factors To Consider When Deciding To Caulk Inside Or Outside The Shower Door Frame
When it comes to caulking a shower door frame, it is important to determine whether the caulk should be applied inside or outside. Several factors should be taken into consideration to make an informed decision:
- Location of the door frame: The location of the shower door frame plays a crucial role in determining where the caulk should be applied. If the door frame is exposed to direct water contact or if it is located on the outside of the shower, then caulking on the outside would be more appropriate.
- Sealing effectiveness: Consider the purpose of caulking, which is to create a watertight seal. It is important to apply the caulk on the side that will provide the most effective seal. Assess the potential gaps or spaces between the shower door frame and the surrounding surfaces to determine whether caulking inside or outside will offer better sealing.
- Aesthetic preference: While functionality should be the primary consideration, aesthetic preference also plays a role. Some individuals may prefer the cleaner and more seamless appearance of caulking on the inside of the shower door frame, while others may prioritize practicality over aesthetics.
Potential Issues Associated With Caulking On The Wrong Side
Caulking on the wrong side of the shower door frame can lead to various issues, including:
- Ineffective sealing: Caulking on the wrong side may result in an ineffective seal, leading to water leakage and potential water damage to surrounding surfaces.
- Mold and mildew growth: If caulk is applied on the inside of the shower door frame when it should be applied on the outside, it can create an environment for mold and mildew growth. This can be detrimental to both the aesthetics and the hygiene of the shower area.
- Difficulty in maintenance: Choosing the wrong side for caulking can make the maintenance and cleaning of the shower door frame more difficult. It can trap dirt, soap scum, and grime, making it challenging to keep the area clean and hygienic.
In conclusion, determining whether to caulk inside or outside the shower door frame requires careful consideration of factors such as location, sealing effectiveness, and aesthetic preference. Applying caulk on the wrong side can lead to issues such as ineffective sealing, mold and mildew growth, and difficulty in maintenance. Therefore, it is essential to make the right decision to ensure a watertight seal and maintain the overall condition of the shower area.
3. Steps To Caulk A Shower Door Frame Inside
To caulk a shower door frame inside, start by applying caulk along the vertical and horizontal planes where two ends meet, excluding areas meant for drainage. Use a caulking gun for better control, or take your time if you’re a DIY homeowner. Properly applied caulk will prevent water leaks and protect against mold and mildew growth.
Preparing the surfaces for caulking
Before you start caulking, it’s important to prepare the surfaces properly. This will ensure better adhesion and a longer-lasting seal. Here’s what you need to do: 1. Thoroughly clean the shower door frame inside and remove any old caulk or residue. You can use a scraper or a utility knife for this purpose. 2. Wipe the surfaces with a mild cleaning solution or rubbing alcohol to remove any grease or grime. This will help the caulk adhere better to the frame.
Selecting the right caulk for interior use
Choosing the right caulk for caulking the shower door frame inside is crucial. You need a caulk that is specifically designed for interior use and is waterproof. Here are a few factors to consider when selecting the caulk: 1. Opt for a silicone-based caulk as it is highly resistant to water and offers excellent adhesion. Look for a caulk that is mold and mildew-resistant as well. 2. Consider the color of the caulk to match your shower door frame. Most commonly, transparent or white caulk is used for shower door frames. 3. Ensure that the caulk is labeled for interior use to avoid any potential damage or discoloration.
Applying the caulk properly
Now that the surfaces are prepared and the right caulk is chosen, it’s time to apply it to the shower door frame inside. Follow these steps: 1. Load the caulk tube into a caulking gun. Cut the tip of the caulk tube at a 45-degree angle to create a small opening. 2. Apply a thin and even bead of caulk along the joint between the shower door frame and the wall. Use steady pressure on the caulking gun, moving it smoothly along the joint. 3. For a professional finish, smooth the caulk with a moistened finger or a caulk smoothing tool. This will help to create a seamless look and ensure better adhesion.
Tips and tricks for achieving a professional finish
To ensure a professional finish while caulking your shower door frame inside, consider these tips:
- Use masking tape on the adjacent surfaces to create clean lines and avoid excess caulk smearing.
- Cut the opening of the caulk tube slightly smaller for better control and precision while applying the caulk.
- Work in small sections to prevent the caulk from drying before it’s smoothed.
- Remove the masking tape immediately after smoothing the caulk to avoid it sticking to the caulk and ruining the finish.
By following these simple steps and tips, you can easily and effectively caulk your shower door frame inside, ensuring a watertight seal and a professional finish. Take your time, pay attention to detail, and enjoy the satisfaction of a job well done.
4. Steps To Caulk A Shower Door Frame Outside
Properly caulking a shower door frame from the outside is essential to maintain its integrity and prevent water leakage. By following these steps, you can ensure a secure seal that will withstand outdoor conditions:
1. Preparing The Surfaces For Exterior Caulking
Before applying caulk, it is crucial to prepare the surfaces appropriately:
- Thoroughly clean the door frame and adjacent walls using soapy water and a non-abrasive sponge to remove any dirt, grime, or previous caulk residue.
- Dry the surfaces completely to ensure optimal adhesion.
- For best results, consider using a mildew and mold cleaner to eliminate any existing fungi or bacteria.
2. Choosing The Appropriate Caulk For Exterior Use
Selecting the right caulk for exterior applications is vital for long-lasting results:
- Preference should be given to 100% silicone caulk, as it offers exceptional durability and flexibility, making it suitable for outdoor conditions.
- Ensure that the silicone caulk is explicitly labeled for exterior use to guarantee weather resistance.
- Consider choosing a caulk with added mildew and mold resistance for increased protection in damp environments.
3. Applying The Caulk Correctly
Follow these steps to achieve a professional-looking caulk application:
- Load the chosen silicone caulk into a caulking gun, following the manufacturer’s instructions.
- Using steady pressure, apply the caulk along the seam between the shower door frame and the adjacent walls. Aim for an even, continuous bead.
- Hold the caulking gun at a 45-degree angle towards the seam, ensuring that the caulk fills the gap adequately.
- Gently smooth the caulk with a caulk smoothing tool or a moistened finger to remove any excess and create a neat finish.
4. Recommendations For Long-lasting Results In Outdoor Conditions
To ensure the longevity of your caulk in outdoor conditions, consider the following recommendations:
- Avoid excessive exposure to direct sunlight, as it can deteriorate the caulk over time. If possible, provide shade or install a protective cover.
- Regularly inspect the caulk for any signs of deterioration or damage, such as cracks or gaps. Promptly repair or replace the caulk as needed.
- Prevent water pooling near the shower door frame by ensuring proper drainage and sealing any potential entry points.
- If your shower door frame is exposed to extreme weather conditions, apply an additional layer of caulk after a few years to maintain its integrity.
By following these steps and recommendations, you can effectively caulk your shower door frame from the outside, providing long-lasting protection against water damage and preserving the structural integrity of your shower enclosure. Remember to regularly inspect and maintain the caulking to ensure optimal performance and prevent any potential issues in the future.
5. Common Mistakes To Avoid When Caulking A Shower Door Frame
Avoid common mistakes when caulking a shower door frame by ensuring you caulk along the vertical and horizontal planes where two ends meet, but leave areas designated for drainage, like weep holes. Use a caulking gun for ease and precision, or consider professional help if you are not confident in your DIY skills.
5. Common Mistakes To Avoid When Caulking A Shower Door Frame
When it comes to caulking a shower door frame, you want to ensure a waterproof seal that will protect against leaks and water damage. However, there are common mistakes that many people make during the caulking process that can compromise the effectiveness of the seal. To help you avoid these pitfalls, here are five mistakes you should steer clear of:
Overusing Or Underusing Caulk
One of the most common mistakes when caulking a shower door frame is overusing or underusing caulk. Applying too much caulk can create an unsightly mess that is difficult to clean up, while using too little caulk may result in an incomplete seal that leaves room for water to seep through. To achieve the right balance, start by using a caulking gun to apply a thin, even bead of caulk along the vertical and horizontal planes where the two ends of the frame meet. Be mindful not to overdo it and remember that less is often more when it comes to caulk application.
Neglecting Proper Cleaning And Drying Before Caulking
Before applying caulk to a shower door frame, it is crucial to thoroughly clean and dry the surface. Neglecting this step can lead to poor adhesion and a weak seal. Begin by removing any old caulk residue using a caulk remover tool or a razor blade. Then, clean the surface with a mild detergent and warm water to remove any dirt, grime, or soap scum. Finally, ensure the area is completely dry before applying the caulk to achieve maximum adhesion and longevity.
Rushing The Caulking Process
Caulking requires patience and precision. Rushing through the process can result in uneven bead application and a subpar seal. Take your time to apply the caulk carefully, ensuring a smooth and consistent bead along the entire length of the frame. To achieve a professional finish, hold the caulking gun at a 45-degree angle and use steady pressure to release the caulk. Move slowly and steadily, maintaining a consistent speed throughout the application. This will help you achieve a clean and even seal.
Failure To Maintain And Inspect Caulking Regularly
Once you have successfully caulked your shower door frame, it is important to regularly maintain and inspect the caulk to ensure its effectiveness. Over time, caulk can deteriorate or become damaged, compromising its ability to provide a watertight seal. Regularly inspect the caulk for any signs of cracking, crumbling, or separation. If you notice any issues, promptly remove the old caulk and reapply a fresh bead to maintain the protective seal and prevent water damage.
In Conclusion
Avoiding these common mistakes when caulking a shower door frame can save you unnecessary headaches and costly repairs down the line. By properly applying caulk, cleaning and drying the surface, taking your time during the caulking process, and inspecting and maintaining the caulk regularly, you can ensure a long-lasting and effective seal that will keep your shower door frame watertight and protected.
Credit: www.buellinspections.com
Frequently Asked Questions For Caulk Shower Door Frame Inside Or Outside
Where Do You Caulk A Shower Door Frame?
Caulk the shower door frame on the vertical and horizontal planes where the ends meet. Avoid caulking areas meant for drainage like weep holes. Use silicone caulk for shower door frames.
Should You Caulk The Inside Of A Shower?
Yes, caulking the inside of a shower enclosure is necessary. When properly applied, caulk helps to control water from escaping the enclosure’s frame and prevents mold and mildew growth. It is important to seal the inside of the shower enclosure to ensure proper drainage and maintenance.
Use silicone caulk for sealing the shower door frame.
Do You Need To Caulk A 3 Piece Shower Surround?
Yes, it is necessary to caulk a 3 piece shower surround. Caulking helps to prevent water from escaping and causing damage. It also helps to prevent mold and mildew growth. Use silicone caulk for the best results.
What Kind Of Caulk Do You Use For A Shower Door Frame?
For a shower door frame, it is recommended to use silicone caulk. Silicone caulk provides a waterproof seal and helps prevent mold and mildew growth. Make sure to apply the caulk along the vertical and horizontal joints of the frame, avoiding areas meant for drainage.
I’m extremely impressed along with your writing talents as well as with the layout to your blog. Is this a paid theme or did you modify it yourself? Either way stay up the nice quality writing, it is rare to see a great weblog like this one today!