
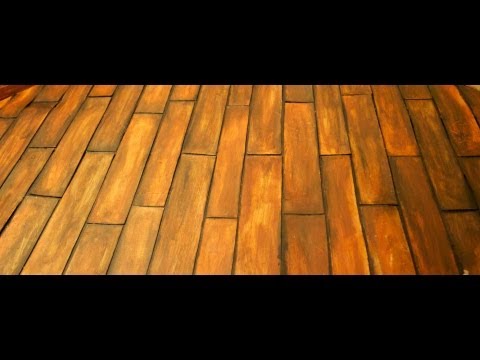
To draw hardwood floors, start by sketching the basic shape and perspective of the room. Then, use intersecting lines to create the pattern of the wood planks.
Add shading and texture to make the floors appear realistic, using light and dark tones to mimic the natural wood grain. Pay attention to details like knots, cracks, and variations in color. Practice drawing different wood patterns and experimenting with different shading techniques to achieve the desired effect.
With time and practice, you’ll be able to create highly detailed and lifelike representations of hardwood floors.
1. Understanding The Basics Of Hardwood Floors
When it comes to drawing hardwood floors, it’s crucial to have a solid understanding of the basics. This knowledge will not only help you create accurate and realistic drawings, but it will also enable you to showcase the different types, benefits, and unique textures that hardwood floors offer.
Types Of Hardwood Floors
Before you start drawing hardwood floors, it’s important to familiarize yourself with the various types available. Here are some popular choices:
| Type | Description |
|---|---|
| Herringbone | A classic pattern made up of rectangular tiles arranged in a zigzag formation. |
| Chevron | Similar to herringbone, but the tiles are cut at an angle, creating a V-shaped pattern. |
| Random Width | Features boards of varying widths, providing a more natural and rustic look. |
| Plank | Long, wide boards commonly seen in traditional hardwood flooring installations. |
| Parquet | Consists of small tiles arranged in geometric patterns, often seen in high-end homes. |
| Reclaimed Wood | Wood salvaged from old buildings or structures, giving it a unique and weathered appearance. |
| Engineered Wood | Made up of multiple layers of wood veneer, offering greater stability and resistance to moisture. |
Benefits Of Hardwood Floors
Understanding the benefits of hardwood floors is essential for capturing their essence in your drawings. Here are some advantages that make hardwood floors a popular choice:
- Timeless and elegant aesthetic that adds warmth and sophistication to any space.
- Durable and long-lasting, with proper maintenance, hardwood floors can withstand heavy foot traffic for decades.
- Easy to clean compared to other flooring options, requiring simple sweeping and occasional mopping.
- Improves indoor air quality by minimizing allergens and dust accumulation, making it ideal for those with respiratory issues.
- Increases the overall value of a property, making it an attractive investment for homeowners.
Tools And Materials Needed For Drawing Hardwood Floors
To create a realistic representation of hardwood floors, you’ll need the following tools and materials:
- Pencil: A high-quality pencil is crucial for achieving precise lines and shading.
- Ruler: This tool helps you maintain straight lines and proportions.
- Erasers: Different types of erasers are useful for correcting mistakes and achieving specific effects.
- Paper: Choose a smooth and durable paper or drawing surface to ensure your artwork lasts.
- Reference Images: Collect reference images of hardwood floors to study their patterns, colors, and textures.
By having the right tools and materials at your disposal, you’ll be able to bring the beauty of hardwood floors to life in your drawings.
2. Creating A Realistic Wood Texture
Learn how to draw realistic hardwood floors with this step-by-step guide. Discover techniques to create a realistic wood texture and bring your drawings to life.
Step-by-step Guide To Drawing A Wood Texture
To create a realistic wood texture in your drawings, follow these step-by-step instructions:
- Start by sketching the basic shape of the hardwood floor using a pencil. You can use a ruler to create straight lines if needed.
- Next, draw the individual planks of the wood by adding vertical lines across the floor. Vary the lengths and widths of the planks to make it look more natural.
- Once the planks are in place, add details such as knots, cracks, and grains to each plank. Remember, wood has unique patterns, so no two planks will look the same.
- Now it’s time to add depth and shading to make the wood texture come to life. Start by shading the areas between the planks to create a sense of depth and shadow.
- Use a cross-hatching technique to add more depth and texture to the wood. Draw diagonal lines across the planks, following the direction of the grain.
- Continue adding shading and texture until you are satisfied with the realistic wood effect.
Adding Depth And Shading For A Realistic Effect
To achieve a more realistic wood texture, it is important to pay attention to the depth and shading. Here are some tips to help you:
- Study reference images of hardwood floors to understand how light and shadow interact with the wood grain.
- Start by shading the areas that are furthest away from the light source. This will create a sense of depth and make the wood texture look more three-dimensional.
- Use a combination of hatching and cross-hatching techniques to add texture to the wood. Vary the direction and density of your lines to create a natural-looking grain pattern.
- Pay attention to the highlights and reflections on the wood. Leave areas of the planks lighter to suggest light hitting the surface.
- Blend your shading with a blending stump or a soft pencil to soften harsh lines and create a smoother transition between light and shadow.
- Finally, step back and evaluate your drawing. Make any necessary adjustments to enhance the realism of the wood texture.
By following these steps and paying attention to the depth and shading, you can create a realistic wood texture that brings your hardwood floor drawing to life.
3. Drawing Different Patterns And Styles
Learn how to draw hardwood floors with different patterns and styles with these easy step-by-step tutorials. From drawing realistic wood with pencil to creating a shining floor, you can explore various techniques and textures to bring your artwork to life.
Whether you want to paint wooden floors or sketch a simple wooden plank, these resources will help you enhance your drawing skills.
Exploring Different Wood Floor Patterns
When it comes to drawing hardwood floors, there are various patterns and styles that you can explore to add uniqueness and character to your artwork. These patterns not only enhance the visual appeal of the floor but also showcase your creativity as an artist. Let’s delve into some of the popular wood floor patterns that you can incorporate into your drawings.
Drawing Herringbone, Chevron, And Other Popular Patterns
One of the most iconic and timeless wood floor patterns is the herringbone pattern. It involves arranging wooden planks in a zigzag pattern, creating a visually stunning effect. To draw a herringbone pattern, start by drawing parallel lines at an angle and then fill in the spaces between them with smaller lines.
Another popular pattern is the chevron pattern, which is similar to the herringbone pattern but with a V-shaped design. To draw a chevron pattern, draw diagonal lines in a V-shape and then fill in the spaces between them with smaller lines.
Aside from these classic patterns, you can also experiment with other popular wood floor patterns such as random width, plank, parquet, reclaimed wood, and engineered wood. Each of these patterns has its unique characteristics and can bring a distinct aesthetic to your hardwood floor drawing.
Incorporating Knots And Grains For Authenticity
To ensure that your hardwood floor drawing looks realistic and authentic, it’s essential to incorporate knots and grains. Knots are circular or oval-shaped imperfections commonly found in wood, which add depth and texture to the overall appearance. Grains refer to the natural patterns that run along the length of the wood and vary in terms of color and texture.
You can create knots by drawing small circular shapes in various sizes and placing them strategically in your drawing. To depict grains, draw curved lines or squiggles that follow the direction of the wood planks. Pay attention to the varying thickness and spacing of the lines to mimic the natural irregularity of wood grains.
By incorporating knots and grains in your hardwood floor drawing, you can elevate its authenticity and make it visually captivating.
4. Adding Details To Enhance Realism
When drawing hardwood floors, adding details is crucial to enhance realism. By incorporating texture, shadows, and variations in wood grain, you can achieve a lifelike representation of the flooring surface.
To truly bring your hardwood floor drawing to life, it’s crucial to add the right details that enhance realism. Here are some techniques and tips to achieve a more authentic and natural-looking wood floor:
How To Draw A Simple Wooden Plank
One way to start drawing a wooden floor is by creating simple wooden planks. Using a ruler, sketch a series of parallel lines to represent the planks. Make sure to vary the length and width of each plank to mimic the natural irregularity of wood. Remember to leave some space between each plank to simulate the gaps between them.
Techniques For Creating Realistic Wood Grain Texture
To achieve a realistic wood grain texture, you can use techniques such as crosshatching and stippling. Start by drawing faint diagonal lines across the planks, following the direction of the wood grain. Then, use a series of short, parallel strokes to create the appearance of grain lines. Vary the length and intensity of these strokes to capture the different shades and textures found in wood.
Tips For Drawing Shadows And Highlights
Shadows and highlights play a crucial role in adding depth and dimension to your wood floor drawing. To draw shadows, identify a light source and imagine where the shadows would fall across the planks. Use hatching or shading techniques to darken those areas. For highlights, identify the areas that would catch the most light and use a lighter pencil or eraser to create highlights on those spots.
Remember to study reference images of real wood floors to understand how the light interacts with the surface and how shadows and highlights are formed. This will help you create a more realistic representation.
In conclusion, adding details is an essential step in enhancing the realism of your hardwood floor drawing. By mastering techniques for creating wood grain texture and understanding how light affects the surface, you can bring your artwork to life. Don’t be afraid to experiment and practice until you achieve the desired level of realism.
5. Bringing The Floor Plan To Life
Learn how to draw hardwood floors step by step with a pencil for a realistic finish. Find easy-to-follow tutorials and videos online for drawing realistic wood textures and patterns to bring your floor plans to life. Explore different techniques and styles to create unique wooden plank designs for your projects.
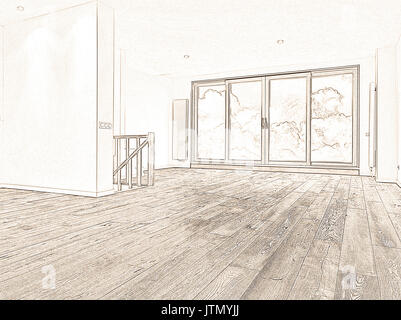
Drawing A Floor Plan With Hardwood Floors
To bring your floor plan to life, start by accurately drawing the layout of the space. Using a ruler and pencil, sketch the walls, doors, and windows. Remember to measure and mark the dimensions for accuracy. Now, let’s focus on incorporating hardwood floors into your drawing.
When drawing a floor plan with hardwood floors, consider the direction of the planks. Is it horizontal, vertical, or diagonal? Visualize the flow of the boards and how they will complement the overall design of the room. Use realistic shading techniques to create depth and texture, making the hardwood floors appear lifelike.
Rendering A Floor Plan With Wood Floor Details
To add more realism to your drawing, it’s crucial to render the wood floor details. Pay close attention to the grain pattern, knots, and color variations. You can achieve this by using different shading and blending techniques. Experiment with cross-hatching or stippling to create a sense of depth and texture. Remember to refer to reference images or actual hardwood floors for inspiration and accuracy. Incorporating furniture and other elements for a complete drawing.
Incorporating Furniture And Other Elements For A Complete Drawing
A floor plan is not complete without furniture and other elements. To bring your drawing to life, add sofas, tables, chairs, and other furniture pieces in their designated places. Consider the scale and placement of each piece to ensure a realistic representation of the room. Use shading and shadows to create depth and make the furniture appear three-dimensional.
Additionally, don’t forget to include other elements such as wall decorations, lighting fixtures, and plants to enhance the overall ambiance of the space. These additions will give your drawing a sense of realism and help viewers envision how the hardwood floors will complement the room’s design.
By following these steps and incorporating hardwood floors, rendering wood floor details, and adding furniture and other elements, you can bring your floor plan to life. Enjoy the process of creating a visually stunning representation of your space and let your creativity shine.
Credit: www.alamy.com
Frequently Asked Questions On How To Draw Hardwood Floors
How Do You Draw Wood Floor?
To draw a wood floor, start by sketching the basic outlines of the planks using a ruler or freehand. Add details like knots, wood grain, and shading to create a realistic effect. Use pencils for shading and texture. You can also follow online tutorials and videos for step-by-step guidance.
Is There A Pattern For Hardwood Floors?
Yes, there are many patterns for hardwood floors to choose from, including herringbone, chevron, random width, plank, parquet, reclaimed wood, and engineered wood. Each pattern has its unique characteristics and benefits.
How Do You Draw A Simple Wooden Plank?
To draw a simple wooden plank, follow these steps: 1. Start by drawing a straight horizontal line. 2. Add vertical lines on both ends to create the sides of the plank. 3. Draw parallel lines across the plank to represent the wood grain.
4. Add knots or imperfections to make it look more realistic. 5. Shade the plank to give it depth and dimension. Remember to practice and experiment with different techniques to achieve the desired effect.
How Do You Draw Realistic Wood Texture?
To draw a realistic wood texture, follow these steps: 1. Start with a basic sketch of the wood shape. 2. Add details such as grain lines, knots, and texture variations. 3. Use shading techniques to create depth and highlights. 4. Add subtle color variations to mimic the natural wood tones. 5. Finish with a final layer of texture and highlights to enhance the realism.
Conclusion
Creating realistic and visually appealing hardwood floors requires a careful approach. By following the correct techniques and understanding different wood patterns, textures, and finishes, you can achieve impressive results. Whether you are a beginner or an experienced artist, this guide has provided step-by-step instructions on how to draw hardwood floors accurately.
By focusing on the details and using shading techniques, you can bring depth and texture to your drawings. Remember to practice regularly and experiment with different styles to improve your skills. So grab your pencil and start creating stunning hardwood floor illustrations today!
A.i driven god level digital marketing agency delhi